Two types of wood trim was used in the interior:
- Solid wood of a very light and fine grain, carefully hand-shaped to fit around the windscreen, all side windows, and on the door panels (twenty pieces in total). This wood has been stained/varnished to have a dark colour.
- Thin, triple-layered veneer on the dashboard, glove compartment and ashtray (five pieces in total). This wood already has a dark colour, and simply contains a thick layer of varnish for beauty and protection.
Preparation
I chose a few small pieces to experiment on (a few solid trim pieces, and one thin piece of veneer form the dashboard, under the glove compartment). The aim was to completely remove all coating, readying it for re-coating. I used the following:
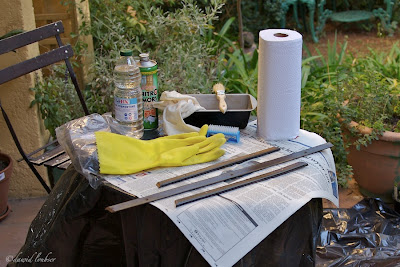
- NitroMors paint stripper, claims to be friendly to wood
- Thick latex gloves for protection against said paint stripper
- Breathing mask (ditto)
- Metal pan and brush to apply paint stripper
- Plastic nail brush
- Steel wool
- ScotchBrite scouring pad (rough texture)

Solid Wood
Using a set of inserts from one of the windows as guinea pig, I applied a liberal coating of paint stripper (one one half only, to leave space for gripping each piece).

As per instructions, after waiting 5 minutes, I applied a second helping ("working" it into the toxic mush) and then leaving it for 20 minutes. After this, one is presented with an ugly sight (bye-bye 45 years of protective coating):

Using the plastic nail brush, I vigorously scrubbed the gunk off,
which easily removed most of the coating. On with the other half...

After this process, I thoroughly scrubbed the wood with steel wool and mineral turpentine, which is supposed to neutralise the paint stripper, and helped remove more of the stubborn coating. In many places, the coating penetrated (discoloured) the wood, so, using fine sandpaper, I sanded the wood until, after an great deal of effort (more then an hour per piece)
I ended up with a beautiful raw piece of wood (in this case, the dashboard radio insert) with a remarkably light colour:

Veneer
In order to ensure that my process does not damage the fine, very thin veneer of the dasboard, I used the small piece below the glove compartment (normally hidden underneath a chrome strip in anyway). Again, I applied NitroMors stripper to half of the piece.

To appreciate just how thin and delicate this veneer is compared to the thick layer of varnish coating, the following picture illustrates a high-magnification side view (and this illustrates how, in some places, the veneer has slightly separated - but not in any important areas). The coating is visible on top of the veneer, and this had to be removed without as much as scratching the veneer - sanding is definitely out.

After 20 minutes, the usual toxic gunk:

After scrubbing with a nail file, a thick rubbery layer of coating still remained - visible on the right (left side already completed for comparison):

This is where the ScotchBrite pad really worked wonders - it enabled me to remove the rubbery coating without any damage to the wood whatsoever, as the coating easily "peals" off - visible on the right (left side already completed for comparison):

Again, I scrubbed the veneer with steel wool and mineral turpentine. As can be see, the raw veneer is now exposed, and looking good (I was afraid the stripper or turpentine would warp, crack or dry it, but there seems to have been no ill effects):

Next Steps
The end result of a days' hard work is the completion of a few wooden pieces (which now appear very raw and dull, but "new"). Assuming the paint stripper leaves no long-term ill effects, the next steps are:
- Bit by bit, complete all the wooden pieces (several months' patient work, I imagine)
- Determine the best process to result in beautiful dark, smooth wood trim encased in a thick layer of transparent coating. I imagine that brush-painting will not make this possible, so I will investigate spraypainting options.
