January 25, 2008

Project Relocation and further ramblings

Well, the donor car has finally been relocated closer to me (to the business premises, in fact) so I expect to be able to spend a lot more time on it. The interior is already mostly dis-assembled, but I have been eager to get cracking on the seats.

This is such a remarkably complete car, even the insides of the doors still contain every last plastic dust cover , the thin ones stuck over the holes to reduce dust and noise. The boot (trunk) contains all the original lining and carpeting material. The list goes on and on...

The task at hand is now to completely disassemble (to the ground - or, rather, to carefully- labeled, photo-referenced boxes) this well aged machine. I just know that it will be a lot easier than putting it back together again. But what a pleasure!

For the first time, I have been able to do a fairly thorough bodywork inspection, both for rust, and general condition / straighness. Apart from a small dent or two, everything lines up perfectly! This is great - because don't you just hate that "wavy" look of a poorly panelbeaten restored car?


January 21, 2008

Becker Europa TG (Photographed)

The restoration effort is at gaining some well-deserved momentum early in the new year, with the donor car being towed to me (for further disassembly) soon. As promised in the previous post, here is what the Becker Europa TG looks like - a real beauty, no?

This is by far the largest and heaviest car radio I have ever seen, but then again - this is also the only car radio from the late 1950s and earlier that I have seen. I can't wait to rig it up and see if it works (as advertised).

November 14, 2007

Radio: Becker Europa TG

Though we have truly not had much chance to work on the wood or leather any further (due to work pressures) I have made one significant addition to the project: I have acquired a working Becker Europa TG radio, the model that originally came with the car.

This was a fairly expensive optional extra, and I have never seen one in South Africa with original radio fitted (on the other hand, I almost never see fintails in the first place...). The radio is beautiful, over-the-top retro, and quite feature-rich: Station presets, and support for FM/AM and short-wave. It's a large, heavy (3kg) device, all metal, glass and tubes. Just another part of this car that is so wonderfully different to modern cars.

When the time comes nearer, I will have to find a suitable (original or other) speaker unit to hook up to the radio, and figure out in general how to get it working (RadioMuseum seems to be a useful resource). This radio is nothing like contemporary car radios - there are no friendly colour-coded or shaped plugs or labels on the rear, everything has to be soldered.

I have not taken pictures of the unit yet, will do so (and post them) once available. If anybody has further information regarding the general connection of this device, and a speaker, please give me a shout!

August 14, 2007

Slow going

We have not had much chance to work on the project over the past couple of weeks, but fear not, hopefully the next weekend will be filled with wood-stripping fun!

July 02, 2007

Restoring wood trim: Preparation

Though quite experimental at this stage, I have started to prepare the car's wood trim for refinishing. After very carefully disassembling the (many) wooden panels, bits, and pieces from the car, and labeling them, they are now stored in a big box.

Two types of wood trim was used in the interior:
  • Solid wood of a very light and fine grain, carefully hand-shaped to fit around the windscreen, all side windows, and on the door panels (twenty pieces in total). This wood has been stained/varnished to have a dark colour.
  • Thin, triple-layered veneer on the dashboard, glove compartment and ashtray (five pieces in total). This wood already has a dark colour, and simply contains a thick layer of varnish for beauty and protection.
In both cases, the coating is quite extensively cracked, and I want to remove absolutely all coating, to end up with "raw" wood which I can carefully refinish to its original luster. In both cases, it is important not to damage the wood (especially the thin, fragile outer layer of veneer used on the dashboard)

Preparation

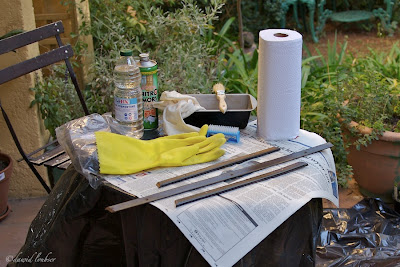
I chose a few small pieces to experiment on (a few solid trim pieces, and one thin piece of veneer form the dashboard, under the glove compartment). The aim was to completely remove all coating, readying it for re-coating. I used the following:


  • NitroMors paint stripper, claims to be friendly to wood
  • Thick latex gloves for protection against said paint stripper
  • Breathing mask (ditto)
  • Metal pan and brush to apply paint stripper
  • Plastic nail brush
  • Steel wool
  • ScotchBrite scouring pad (rough texture)
You can't perform tedious, noble labour such as this without indulging in some good music, and a 1960s recording of Madame Butterfly was a perfect match :-)


Solid Wood

Using a set of inserts from one of the windows as guinea pig, I applied a liberal coating of paint stripper (one one half only, to leave space for gripping each piece).


As per instructions, after waiting 5 minutes, I applied a second helping ("working" it into the toxic mush) and then leaving it for 20 minutes. After this, one is presented with an ugly sight (bye-bye 45 years of protective coating):


Using the plastic nail brush, I vigorously scrubbed the gunk off,
which easily removed most of the coating. On with the other half...


After this process, I thoroughly scrubbed the wood with steel wool and mineral turpentine, which is supposed to neutralise the paint stripper, and helped remove more of the stubborn coating. In many places, the coating penetrated (discoloured) the wood, so, using fine sandpaper, I sanded the wood until, after an great deal of effort (more then an hour per piece)
I ended up with a beautiful raw piece of wood (in this case, the dashboard radio insert) with a remarkably light colour:


Veneer

In order to ensure that my process does not damage the fine, very thin veneer of the dasboard, I used the small piece below the glove compartment (normally hidden underneath a chrome strip in anyway). Again, I applied NitroMors stripper to half of the piece.


To appreciate just how thin and delicate this veneer is compared to the thick layer of varnish coating, the following picture illustrates a high-magnification side view (and this illustrates how, in some places, the veneer has slightly separated - but not in any important areas). The coating is visible on top of the veneer, and this had to be removed without as much as scratching the veneer - sanding is definitely out.


After 20 minutes, the usual toxic gunk:


After scrubbing with a nail file, a thick rubbery layer of coating still remained - visible on the right (left side already completed for comparison):


This is where the ScotchBrite pad really worked wonders - it enabled me to remove the rubbery coating without any damage to the wood whatsoever, as the coating easily "peals" off - visible on the right (left side already completed for comparison):


Again, I scrubbed the veneer with steel wool and mineral turpentine. As can be see, the raw veneer is now exposed, and looking good (I was afraid the stripper or turpentine would warp, crack or dry it, but there seems to have been no ill effects):


Next Steps

The end result of a days' hard work is the completion of a few wooden pieces (which now appear very raw and dull, but "new"). Assuming the paint stripper leaves no long-term ill effects, the next steps are:
  • Bit by bit, complete all the wooden pieces (several months' patient work, I imagine)
  • Determine the best process to result in beautiful dark, smooth wood trim encased in a thick layer of transparent coating. I imagine that brush-painting will not make this possible, so I will investigate spraypainting options.

June 28, 2007

Dashboard disassembly

Well, it took almost a whole day to disassemble the dashboard - now all that is left are the main electric harnesses, and the heating.


The dashboard is a fixed metal part of the chassis, and it is quite difficult to remove all the elements from within this framework. This is luckily counteracted by the overall simplicity of the car.

It was difficult to reach in everywhere to loosen the delicate chrome and wood panels, but by far the most difficult was to get in there and remove the instrument cluster. Most modern cars have simple electrical plugs that connect to the instrumentation, but in this case, several metal and copper pipes that physically convey water temperature and oil pressure had to be carefully loosened. The instrument cluster has the look and feel of a very old, delicate science instrument at the back, and you have to contort your arms and body into ridiculous positions to be able access the back of the cluster whilst still in position. I only found out later that I actually only had to loosen the one large retaining screw, as well as the main electrical plug, and that I could then pull the whole cluster out far enough in order to loosen the rest from the front

Interestingly enough, I had to physically remove the temperature gauge module from the instrument cluster, as it is connected to the engine with a single-piece metal pipe that cannot disconnect from the gauge itself (visible in the image above, wrapped in plastic for protection). But I fear for the day when I have to put the instrument cluster back together again!

I'm sure that the damaged soft vinyl covering of the dashboard could be repaired, but I'm just going to use the one from the other car, still in great condition. The wood, however, will be carefully re-finished.

Project plan

Car restoration projects can easily become half-hearted, years-long affairs - some sad hulk of metal sitting in a back yard rusting away. Well not this project! I want to have the bulk of the work done in this year, which means I have about 6 months to accomplish this in. The goal of the project is to end up with an all-original, near-perfect car. The raw material is thus:
  • My badly rusted but mechanically excellent 220b, currently registered in my name
  • The newly acquired "donor car", a badly weatherbeaten but 100% original and complete, practically-rust-free 220Sb, which I legally bought, but for which there are no ownership papers available anywhere (which may turn into a bit of an administrative headache)
The plan is to use the donor car's complete body and chassis, and to completely restore its interior (to do this, I have to figure out how to sort out the ownership papers situation before having to resort to more "creative" methods). Even though this will sentimentally hurt, I will thus only use the mechanical components from my original 220b, and correctly upgrade my excellent engine to 220Sb specification. I think the following will thus be a sensible approach to the project:
  1. Completely disassemble the 220Sb, starting with the interior.
  2. While starting to work on the wood and leather, get a quote to completely repaint and rust-treat the disassembled body.
  3. In the meantime, work week-ends on restoring the wood
  4. After the wood is done (after months of sweat and toil), work week-ends restoring the leather
  5. Once an acceptable quote is received, completely disassemble the rest of the car (with the help of Attie for the major mechanical components). This should be considerably less fiddly than disassembling the interiour.
  6. Send the car for painting
  7. While the car is being painted, start disassembling the mechanicals from the 220b, and upgrade the engine to 220Sb spec by transplanting the carburettors and intake manifold.
  8. When the car has been painted, assembly minimum required interiour components (i.e. driver's seat, steering wheel, basic electrics and windows) and then focus on the mechanical aspects of the car - suspension, engine and gearbox.
  9. Assemble and complete all electrics, lights, heating and ventilation, etc
  10. Assemble restored interior
Time will tell whether this is ambitious for a 6-month project, but that is our goal... We are attentive to any suggested plan changes based on past experience.